METROLOGY TESTING
The performance quality of every Primatics stage is verified to ensure that they meet published specifications—for most positioning stage products this conformance is shown in a clear and concise graphical data plot of the test results taken directly from production testing. A copy of these plots are included with the shipment of each stage. All catalog specifications, and specs for custom systems, are generated on a per axis basis, unless otherwise specified.
LINEAR STAGE TESTING
At Primatics, we follow the ISO 230-2 directive when measuring accuracy, repeatability, straightness and flatness—we abide by the following criteria for all tests unless otherwise stated in the following sections, all of which contain more specific information on our testing methodology.
All tests are performed in a temperature-controlled environment (20°C, 68°F). Any change in the ambient temperature can cause thermal expansion and contraction, which, in turn, can cause positioning errors—these positioning errors are caused by the thermal expansion of the stage itself, as well as angular errors resulting from differing expansion rates of the bearing and drive train systems.
All test points are taken at random positions along the normal travel of the stage, yielding a non-uniform spacing of the target positions over the measurement travel. This ensures that periodic errors (such as the errors caused by the pitch of the ballscrew or the pitch of linear or rotary scales) are adequately sampled.
All test points have a 2-second dwell time before laser data is collected.
All performance tests are generated using a step cycle, rather than a standard test cycle. A step cycle test is when the carriage element is started at one end and repeatedly incremented back and forth towards the other end of travel. A standard test cycle is when the carriage element is started at one end, progresses to the other end of travel and then returns to the starting point. Repeatability measurements according to the standard test cycle may reflect thermal influences that affect the various target positions along the axis under test. During a step cycle, thermal influences may be evident in the range of the mean bidirectional positional deviation, whereas the repeatability will only be slightly affected by the thermal behavior of the machine and test environment.
All testing (unless otherwise specified) is performed with the laser optics at a height of 50 millimeters above the center of the carriage at a no-load condition.
Primatics performs many displacement measurements with a laser interferometer system mounted on a laboratory AA grade granite surface plate—it has a position resolution of 1.24 nanometers and a wavelength stability of +/-0.01 parts per million.
ACCURACY TESTING
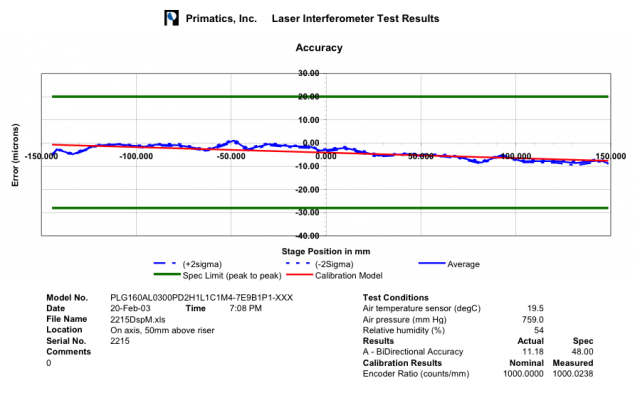
The accuracy of our linear stages are tested using a laser interferometer and the appropriate optical instrumentation—accuracy is tested using a minimum of 4 repetitions per target point to determine a +/-2 Sigma error limit. The error plot clearly specifies bidirectional positioning performance with statistical error bands. A calibrated accuracy value is indicated on the linear accuracy plots for the client’s convenience. A typical accuracy plot can be seen in the plot below.

REPEATABILITY TESTING
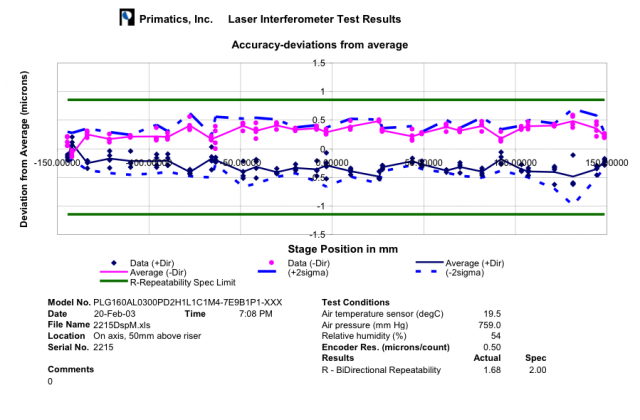
All repeatability tests are performed at the same time as the accuracy tests using a laser interferometer—repeatability is tested using a minimum of 4 repetitions per target point to determine a +/-2 Sigma error limit. The error plot clearly specifies bidirectional positioning performance with statistical error bands. A typical repeatability plot can be seen below.
Test results may indicate backlash in the stage being tested—this is not the case. The separation of the two lines is twice the resolution of the feedback device, which is a result of approaching the encoder point from one direction and then from the other direction. This is a function of a digital feedback device which indicates that the bidirectional repeatability will not be better than the resolution of the feedback device.

STRAIGHTNESS TESTING
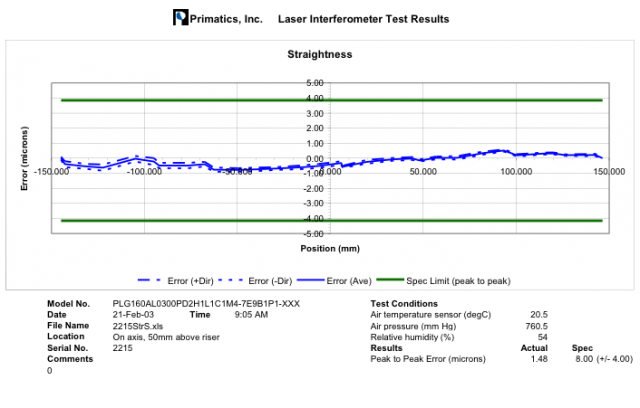
The straightness of our linear stages is tested using a laser interferometer and the appropriate optical instrumentation—a typical straightness plot can be seen in the example below. Straightness is tested using a minimum of 1 repetition per target point to determine an error limit from approaching a point from the positive and negative directions. See the plot below.

FLATNESS TESTING
The flatness of our linear stages is tested using a laser interferometer and the appropriate optical instrumentation—flatness is tested using a minimum of 1 repetition per target point to determine an error limit from approaching a point from the positive and negative directions. A typical flatness plot is very similar to the straightness plot above.